Introduction to Git and Github
Jason M. Kelly and Ian Milligan
Introduction
You may encounter Git throughout the digital humanities ecosystem. Many projects host their code base or data on the GitHub platform, which uses the open-source "Git" process to help manage files, code, and beyond. Additionally, collaborative projects often use "GitHub" as a way to keep track of various code versions, and allow contirbutors to make contributions -- and project owners to review contributions.
Git, however, has a somewhat steep learning curve. It does not always seem intuitive, and references to "forking repositories," "pulling," "committing," and "pushing" all make specific reference to various commands. In this tutorial, we walk users through the process of installing, using repositories, and contributing to them.
We believe that this is an important skill for a digital humanist to use, both to engage in collaborative open-source software projects, but also to use many of the tools and projects (including the Programming Historian) which use this approach.
What is Git?
The easiest way to think about Git is as a process for saving versions of your files. If you make a change and want to go back, Git will catalog earlier iterations of your work. In other words, at its core, Git is a version manager. Unlike some other programs that manage versions, Git is not automatic. You decide what versions of files you want to save.
The full documentation for Git is available here: https://git-scm.com. While Git can be used independently of GitHub, GitHub is the largest open-source code platform in existence. Consequently, we will show how Git and GitHub can be used together.
You can use Git in two ways: locally and remotely. Using Git locally
means that you are versioning only on your own computer. Effectively,
you are keeping track of your versions for your personal use. Using Git
remotely means that you are keeping your versions on a server. If you
make your project public to other users, you can use Git to share or
collaboratively develop it. If you want to share your project, users can
clone it and use it in their own environments. If you want
to work collaboratively, users can branch a project,
develop revisions, and then merge the revisions back into your
version.
While Git was originally developed for coding, there are numerous applications for individuals working in the digital humanities: from sharing and building datasets to cowriting websites, grant proposals, and books.
At this point, you may be asking yourself why you would want to use Git if many of these features are already available in other programs. After all, WordPress can keep versions of webpages and track who updated them. Microsoft Word can be set to autosave. And, Google Docs can keep track of who made updates. All of these things are true, but there are some good reasons for using Git instead:
Level of Control: None of the programs above offer the level of control provided by Git. For basic projects, such as a single paper, this is less important. But, for larger projects, with multiple types of documents and collaborators (imagine the paper, the datasets, some notes, and bibliographic references), the ability to keep track of every fact is invaluable. Moreover, Git is a single program for handling every type of document that you use. So, even if one of your programs doesn't include version control, Git provides it.
Granularity: Git is ideal for keeping track of every substantive change to your files. On top of this, it allows users to add detailed annotations that explain changes and updates. The added features provided by GitHub allow users to create issues where all discussions and comments can be tracked about specific concerns.
Testing: Git provides an environment in which projects stages can have branches. Imagine branches as alternative timelines where you can try out different scenarios. In the case of coding, this branch might be used to develop a feature or clean up code. In the case of a shared humanities project, this might be for developing a section of a larger piece. Then, when these sections are complete, they can be merged back into the original project.
Freeware: For many users concerned with the ethics of software development, freeware, as defined by the GNU Project, is important. Git is open source, and as a consequence, users are not tied to the exigencies of the market.
The Command Line
You will work with Git using a command line, such as bash or zsh. Having some command line knowledge is valuable, but not necessary for this tutorial. To learn more about the bash command line, read the Programming Historian tutorial Introduction to the Bash Command Line.
Installation
Windows
Windows users will need to install Git. You can do this from the main page of the Git website: https://git-scm.com.
Mac and Linux
Mac and Linux systems come pre-installed with Git, so you should not need to download them.
Setup
To setup Git, you will need to enter the following commands into you bash command line. This is a one-time task.
- Setup your user name for git.
git config --global user.name "[firstname lastname]"
- Setup your email for git.
git config --global user.email "[email]"
- (Optional) Add coloring for Git to the command line.
git config --global color.ui auto
Create a Repository
To create Git repository, you need to navigate to the folder for which you want to create a repository. For this tutorial, we recommend creating a new directory in your documents folder.
You can navigate there by typing
cd Documents
Once you are there, create a new Directory named dh-git with the following command:
mkdir dh-git
To go inside your new directory, type
cd dh-git
To initiate your new repository, type
git init
This simple command creates a database for tracking changes to your
directory. It will live inside your dh-git folder. However,
you can't see it with a simple ls command. This is because
it is hidden. However, if you type the following, you will be able to
see your .git repository.
ls -a
Working Within a Repository
Let's create a few files inside the repository. You can do this using the touch command. Let's say that you want to create a new markdown file and a new html file within folder. All you would need to do is type
touch git-summary.md index.html
You could have named these files anything. Use the ls
command, and you will see that these file are now in your directory.
You can see that these are empty files by using the open
command. For example, you can open git-summary.md using your text editor
by typing
open git-summary.md
You've now created a few files inside of your folder. Now, what you want to do is commit them to your Git database. This is a two-stage process.
First, you want to add them to your staging area by using the
git add command. You have two options with
git add. You can stage individual files, or you can stage
your entire folder.
To stage an individual file, you would write
git add git-summary.md
If you wanted to stage the entire folder, you would write
git add .
More often than not, you will be staging the entire folder, but you have the option.
After you have staged the files with git add, you need
to commit them to memory. You'll do this by typing
git commit -m "added two files to the folder"
The git commit adds the changes to the database. the
-m command adds a message to the commit. In this case, We
made a note for ourselves that we had "added two files to the folder".
We could have written anything in the quotation marks, but it's most
useful when you can provide some details of your updates for later
reference.
When you hit return after this line, you will get a report about the changes you made.
git diff
When you are working, you may stage a file and then continue working
on it before you commit. If you want to see the differences between the
staged file and the unstaged file, you can use git diff. It
will display text that you have deleted as well as text that you have
added.
You can also use git diff to see the difference between
your staged item(s) and your last commit. You do this my typing
git diff --staged.
After Your First Commit
Now that you have made an initial commit, you can make changes to the folder. You can add files, add text within files, delete files and folders--whatever you want. Let's try it.
Delete the index.html file using the Remove command:
rm index.html
Then, add text to your markdown file by opening, editing, and saving it. Remember, you can open the file from the command line:
open git-summary.md
Let's create a new file as well:
touch anotherfile.html
Now that you have made these changes, make another commit. Remember,
it's a two-step process. First you stage with git add and
then you save with git commit:
git add .

git commit -m "some more changes"
As you develop more items for your folder, you would continue this process over and over. Each time you commit, you will gave a snapshot of your updates.
Looking At Your Changes
The whole reason that you are versioning with Git is so that you can go back to a prior version in case something gets deleted or something goes wrong.
The way you go back to look at your commits is through the
git log command. Type the following:
git log
You will see that not only are your commits and your notes listed in order, but they are time stamped with your name and email.
If you need to go back to look at a former iteration of a file, all you need are the commit codes listed in your log. These are the long string of numbers and letters listed next to the word "commit."
Returning to a Previous Iteration
If you want to return to a previous version of a your file, Git
allows you to go back and use it. It does this by creating a
branch--i.e. a copy--of your original set of saved
versions. It looks something like this:
    gitGraph

       commit id: "commit 1"

       commit id: "commit 2"

       branch "new branch"

       commit id: "version 2b"

       checkout main

       commit id: "commit 3"

       commit id: "commit 4"
In the diagram, you are creating versions of your folder, just as you did above. These are the versions on your "main" branch (sometimes this is called the "root branch," and in Git and GitHub, it was formerly referred to as the "master" branch - you may encounter older repositories that use this language).
Let's say that you have run four commits. You will see on the diagram
that there are four nodes indicating each commit on the main branch.
After running git log you then realize that you want to
return to your second commit. This is easy to do using the
checkout command.
In Git, you go to the main branch and choose the version that you
want to have a look at. Remember the commit codes for each version shown
by the command git log? All you need to do is copy the code
and checkout that version. Let's do this:
git checkout 3d87616f4b35abbff4fb2693b3f90c17b2643692
Now, type
ls
You will receive the list of files from your previous iteration. In your case, these were git-summary.md and index.html.
Let's look at the diagram again.
    gitGraph

       commit id: "commit 1"

       commit id: "commit 2"

       branch "new branch"

       commit id: "version 2b"

       checkout main

       commit id: "commit 3"

       commit id: "commit 4"
By using the checkout function, you have created a copy
of your original version. You call this new version a branch, because
you are branching off the original version. Any commits you make to this
new version will apply to the new branch and not change the original
branch. It will look something like this:
    gitGraph

       commit id: "commit 1"

       commit id: "commit 2"

       branch "new branch"

       commit id: "version 2b"

       commit id: "version 2c"

       commit id: "version 2d"

       checkout main

       commit id: "commit 3"

       commit id: "commit 4"
You can always see which branch you are on by using the
branch command:
git branch
This command will output something like
(HEAD detached at 3d87616). This tells you where your new
branch has diverged from the original branch.
You can make as many changes as you want in the the "detached HEAD"
state. This includes making commits. It's important to know, however,
that the database will not save these changes unless you formally save
your new branch. You do this with the switch command.
To save any changes you make (including the list of commits) to the new branch, type
git switch -c new-branch-name
You can rename [new-branch-name] with any filename you want.
Branches
If you want to see which branches are available, you can use the
branch command:
git branch
This will list all of you branches. If you do this now, you will see two branches: main and new_branch. The one you are currently on with have an asterisk next to it.
If you want to return to the main branch--or switch between branches
in Git--you use the checkout1
command:
git checkout branch-name
To return to your main branch, you would type the following:
git checkout main
You can verify that you are on the main branch using the
git branch or git log commands.
Adding and Deleting Branchs
You already know how to add a branch from a specific commit:
git checkout 3d87616f4b35abbff4fb2693b3f90c17b2643692
You can also add a new branch from wherever you are working:
git checkout -b new-branch-name
Try it using the following command:
git checkout -b third_branch
Then, run the git branch command. You will see that the
asterisk is next to third_branch, which is now a third
branch (and technically the second branch off of the
main branch).
Let's add a new file to this branch and work through the staging and commit process:
touch third_branch_file.md
This creates a new markdown file named
third_branch_file.md. You can always check this with the
ls command.
Now, let's practice staging this new change:
git add .
Now let's compile it into your repository:
git commit -m "added the third_branch_file markdown document"
You can see your change using the git log command.
So far, you have been adding branches, but what if you want to delete a branch? That's just as easy. You use the following command:
git branch -d branch-name
Let's try it with third_branch:
git branch -D third_branch
You will see that you get an error. That's because you cannot delete a branch that you have checked out. You need to switch to another branch:
git checkout main
Now try running
git branch -D third_branch
You will see that you have deleted third_branch.
Merging Branches
You may be wondering why you would create a branch in the first place. After all, versioning along one branch allows you to go back and find an earlier version. This is a reasonable question.
For basic, single-author development, you may not need to create branches. But, if your project is complex--and, more importantly, if you begin collaborating with others--you will want to use branches. Let's take the simple example of a web development project. Let's say that you want to experiment on three different layouts for your web pages. Instead of creating three versions of every component of your page in the same folder structure, you can keep the three versions on three branches. You can experiment easily on each of the branches and then merge your preferred version back into the original version.
For individuals who are hosting live projects, branches allow them to create a development environment until they are ready to update the live version.
For multi-author development, the value of branches is obvious. Different individuals can work on aspects of the larger project without interfering with the others. When their part of the project is complete, whoever is the primary administrator can merge the changes back into the original version.
Let's check in on which branches you have created:
git branch
You will see that you have two branches: the main branch and the new_branch. If you are not already in new_branch., let's go there
git checkout new_branch
Create a new file:
touch newfile.md
You can open it with the open command:
open newfile.md
Your text editor should open the file. Now, add some text. You wrote, "This is my new file." Save it, close the file, and return to your Terminal.
You've updated this file on new_branch. Let's imagine
that we're happy with it and want to merge it to the main branch. As
always, you will need to stage and commit changes to your
repository:
git add .

git commit -m "added text to newfile.md"
To merge this (and any other changes) to your main branch, you need to move back to the main branch:
git checkout main
This is because you want to be in the branch that pulls in the updates.
To merge branches, you want to use the merge
command:
git merge new_branch
You can see that the newfile.md has been added to your
main branch with ls.
Other Commands and Conclusions
These commands cover the main commands that you will use in git.
There are more options. For example, earlier we noted on Mac systems
you may want to not have DS_Store files added to
repositories: by default, you would have this file within each Git
folder.
You can create a file named gitignore to "ignore"
certain kinds of file. To do this, create a new file
.gitignore in the main directory of your repository. The
period before the file notes that it is a hidden file (remember, to see
hidden files, you type ls -a). Open it in your
terminal, and then add this one line to the file:
.DS_Store
When .gitignore is added to your repository using
git add .gitignore, in the future, these
DS_Store files will not be added.
We present this example in part because one of the authors really
dislikes these DS_Store files, but that it illustrates in
some ways the limitless potential of Git. If you can imagine a problem,
try searching for it on the Web: chances are, somebody has an idea to
handle it.
GitHub
Git and GitHub are not the same thing. Git is an open source program that allows you to manage versioning of your projects. GitHub, a subsidiary of Microsoft, is an online space that uses Git for storing your Git projects. The benefits of using GitHub are twofold. First it allows you to store your projects in the cloud. Second, GitHub is built to facilitate sharing and collaborating on Git projects.
Setting Up GitHub
Setting Up a GitHub Account
In order to use GitHub, you need an account. To set up an account, go to https://github.com. You will need to follow the steps for creating a new account.
GitHub Security
Once you have a GitHub account, you will need to set up your computer's security environment so that you can connect remote repositories (i.e. repositories on your computer with repositories on GitHub).
There are a number of ways to do this, but GitHub recommends using Git Credential Manager. To install Git Credential Manager, you will need to download the version for your system at https://github.com/git-ecosystem/git-credential-manager/releases.2
This should be all you need to do, because the installation will set up your computer system defaults.
Connecting a Repository to GitHub
There are two primary ways to connect repositories to GitHub. This tutorial will walk you through the easiest way to do it (even though this is not the technique suggested in the GitHub documentation). The reason that we are not recommending the technique suggested in the documentation is because there are extra steps that could cause confusion for beginners.
Step 1: Set Up a Repository in GitHub
Setting up a repository in GitHub can be done through your browser. Navigate to https://github.com and click on the green box in the top left side that says New. This will open up the Create New Repository page.
Choose a name for your repository. Let's call it
first_github.
Click on the box next to Add a README file.
You can decide whether to keep your site public or private. It doesn't matter for this lesson.
Then, click on the button at the bottom, Create repository.
As you will see, you have created a new repository. Your Initial commit was creating the README.md file.
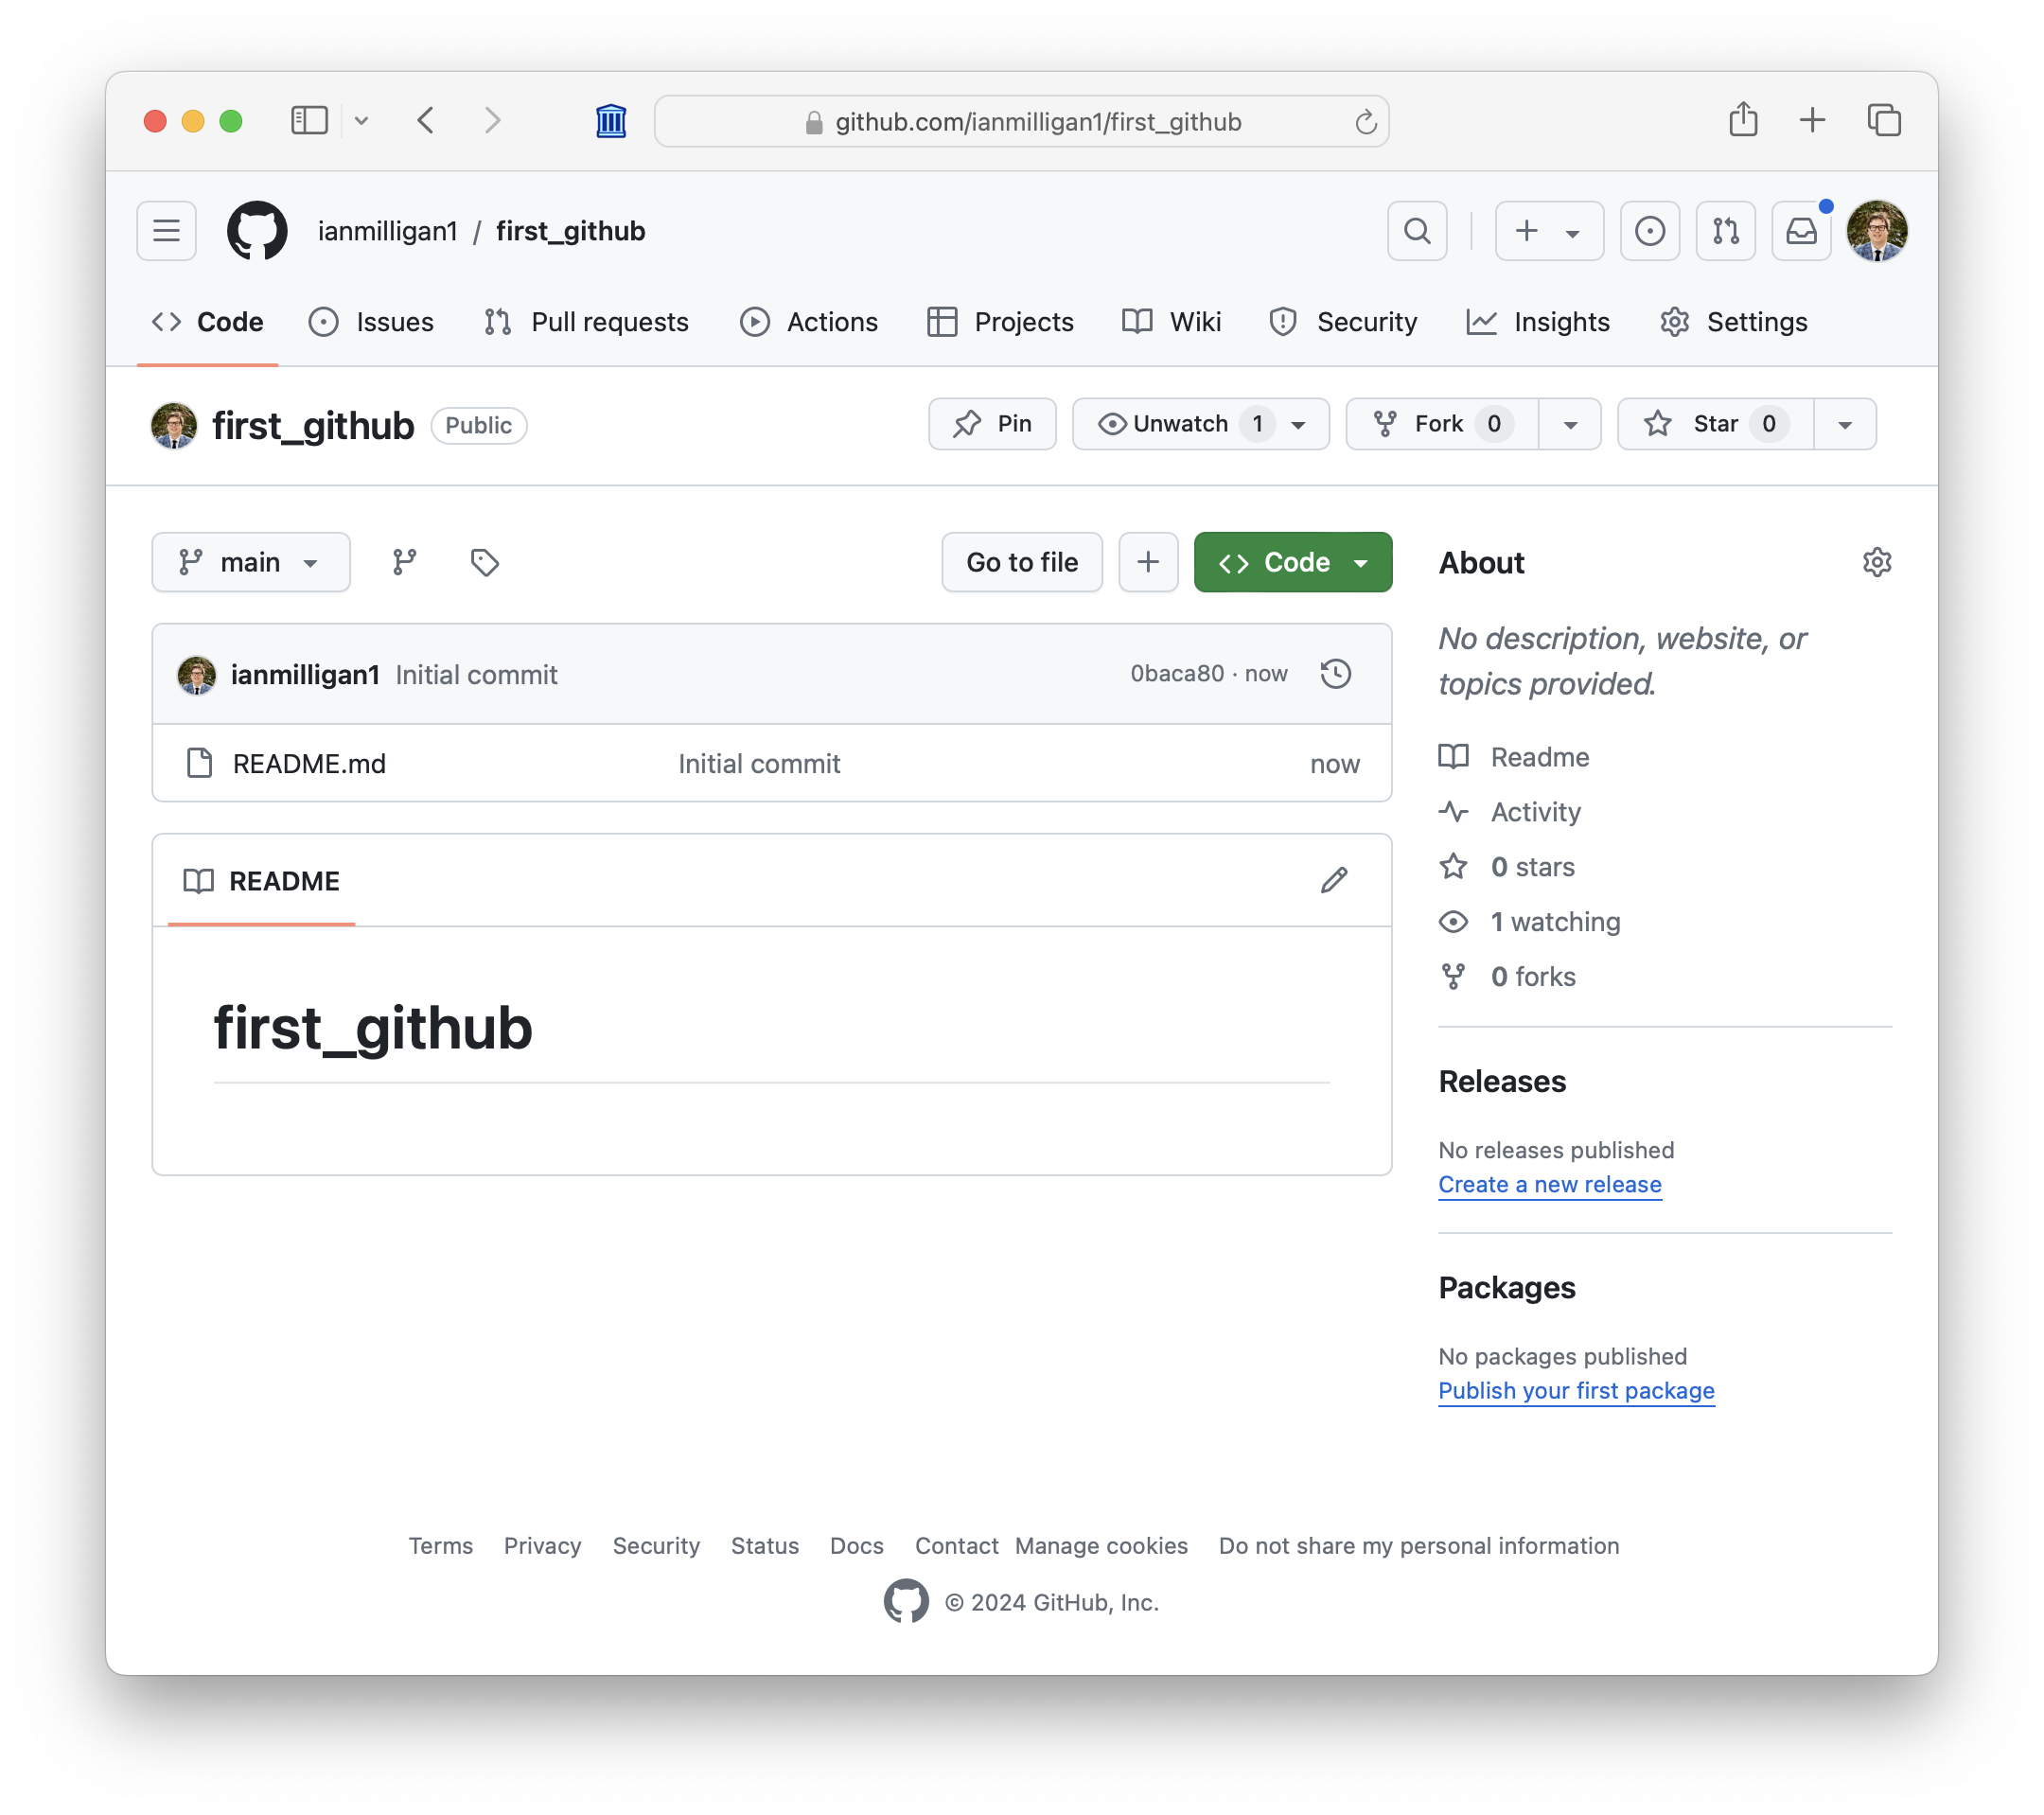
Step 2: Setting Up a GitHub Repository Folder
You can put a GitHub Repository anywhere on your computer that you like. For this tutorial, you are going to create a GitHub Repository folder for all of your repositories in your Documents folder.
Navigate to Documents:
cd ./Documents/
Inside Documents, create a new GitHub repository directory:
mkdir git_repositories
Navigate into git_repositories:
cd git_repositories
Step 3: Clone the GitHub Repository
Now that you have created your first_github repository on
the GitHub server, you will want to clone it on your local
git_repositories directory.
Creating a clone in GitHub means that you have not only
downloaded all the files but that you have downloaded the Git repository
as well. This allows us to keep track of versions and sync between your
local files and those on the server.
To clone the repository, you use the git clone command.
To this, you add the URL to your repository. You do this by pressing the
green <> Code button on your GitHub repository
page.
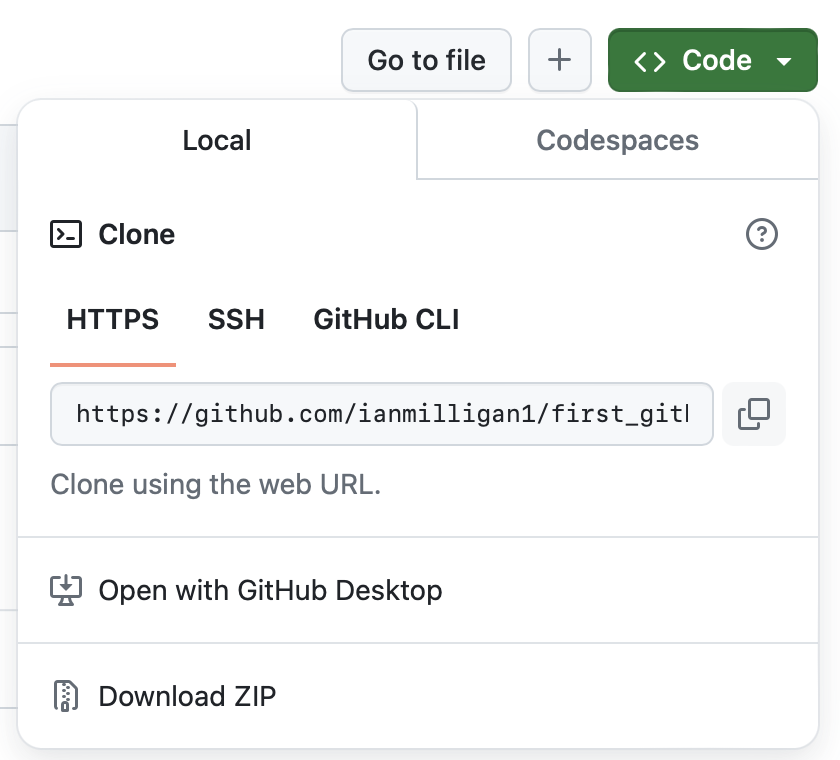
To clone this repository, you will add this URL to the
git clone command in your command line. It would look
something like this:
git clone https://github.com/6500jmk4/first_github.git
If you are collaborating with a group of people you will sometimes need to clone only a specific branch within the repository. To do this, you would write the following:
git clone --single-branch --branch <the name of the branch you would like to clone in Github> <the repository url from Github>
If you type ls inside your directory, you will see that
the README.md document is now inside your new
first_github folder:
cd first_github

ls
Step 4: Add Your Files to the Local Repository
Now that you have a local and remote repository that are linked via your Git database, you can begin making changes and syncing them.
Add a new file to your first_github folder:
touch first.md
This adds a new file to your local repository. If you want to sync this change to your remote repository, you have to stage and commit your changes first--just as you always do when you update your Git database.
Step 5: Stage and Commit Your Changes to the Local Repository
git add .

git commit -m "added the first.md file"
Now that you have committed the changes to your Git database, you
want to push them to your online repository.
Step 6: Push Your Files to the Remote Repository
To push your updates to your remote GitHub directory,
simply type:
git push origin
Origin is how Github refers to its repositories and lets you know what is remote and what is local. If you refresh your browser and look at your GitHub repository, you will see that your new first.md file is now available in your remote repository.
Working Collaboratively in GitHub
The benefits of working in GitHub include its collaborative features. Going over all of GitHub's features would require its own tutorial. In this section, we will focus on the basics necessary for collaborating on a GitHub project.
Issues
One of the most valuable features of GitHub is the ability to use the Issues feature. Issues allows users to communicate effectively with each other as they build out their projects. It's similar to a bulletin board system or threaded text chat. An individual can post a comment, question, problem, etc., and their collaborators can then engage in a discussion with them. Each Issue begins a new thread. Teams can use Issues to organize members by assigning one or more individuals to each issue.
To use Issues, team members log in to their repositories. Across the top of the screen, there are a number of tabs to choose from. The first is "<> Code," and the next is "Issues." Clicking on Issues will open the interface.
Adding a New Issue
To add a new issue, click on the green button on the top right: "New Issue." This will open another interface where you can title your issue and describe it. On the right side, you can assign collaborators to issues. You can also use labels to organize issues into categories. Once you have added a new issue, click on the "Submit new issue" button on the bottom right. This will add it to the list on the Issues landing page.
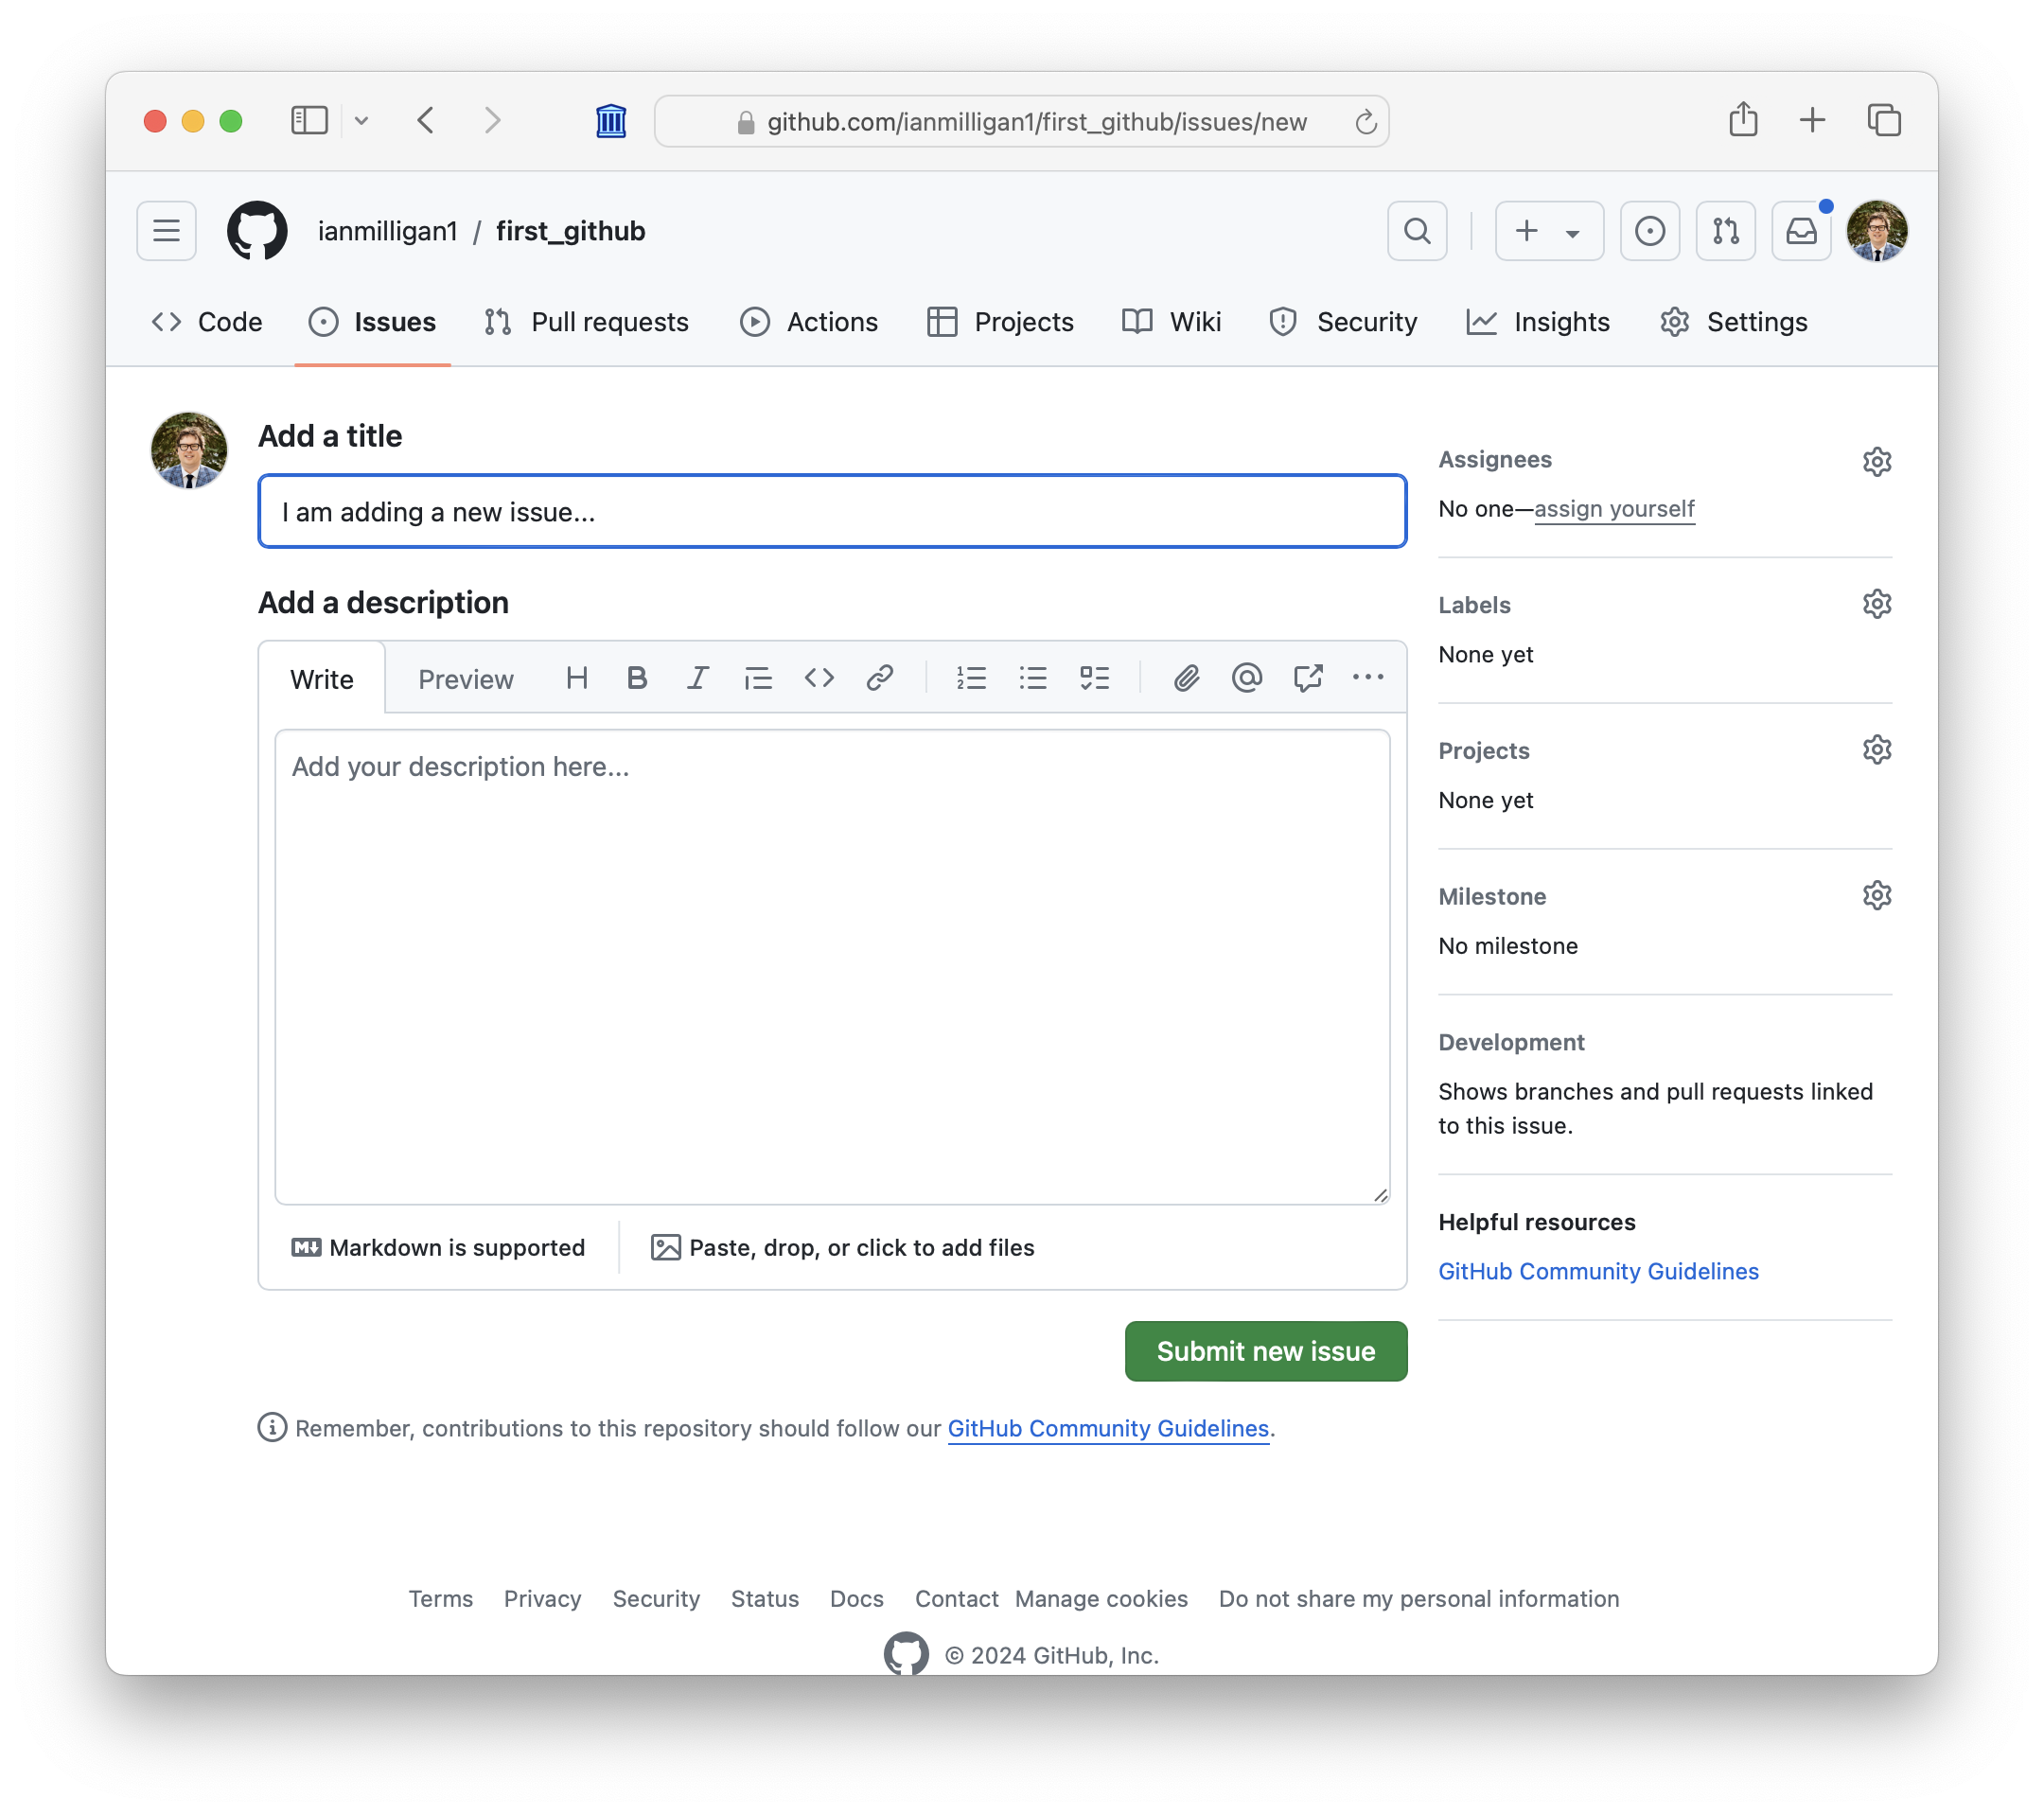
You can use the Issues menu to sort through authors, assignments, and categories.
Closing an Issue
Once you and your collaborators have addressed an issue, you will want to close it. To accomplish this, all you need do is click on the issue, scroll to the bottom of the page, and click the "Close issue" button. You will notice that the button has a dropdown next to it that allows you to indicate whether the issue was resolved or abandoned.
Branching in GitHub
Just as you would in your local version of Git, you can create
branches through the GitHub web interface. There are multiple ways to do
this, but the easiest way is to to go to your repository's main page and
click on the dropdown menu at the top left of your file list. If you are
in the first_github repository, it will be labeled
main if you have only one branch.
When you click on the dropdown, you will see any branches that you
have already created as well as the option to switch to them or create
new ones. Let's create a new one titled "branch2". You will notice that
you now have an option that should say something similar to "Create
branch branch2 from main". Click on it to
create your new branch.
You will notice that the dropdown menu now tells you that you are now
on branch2 and that there are now two branches. Any updates
that you make now will be in this new branch.
Go back into your command line and navigate to the
first_github folder. You will see that the changes you made
in the GitHub repository have not been synced to your local version. To
sync the files, you will need to fetch the files and
merge them with your local repository. You will learn more
about this after you review some tools that you can use to keep your
local and remote repositories in sync.
Keeping Your Local and Remote Repositories in Sync
Since this tutorial is focusing on command line git, it is important to remember a simple principle: you cannot directly edit the remote repository from your command line. In Git, you are always working with local files. When you want to update the remote repository, you push changes from your local repository. When you want to update your local files, you pull changes from the remote repository.
If you make changes to the files using the GitHub web interface, these are not automatically synced to your local computer repository. Likewise, when you make changes to your local repository, these are not automatically synced to the remote repository. Consequently, it's a good idea to make sure that your local and remote repositories are in sync on a regular basis.
Typically, you would check for any syncing issues at the beginning of a working session. There are a few commands you should know and use regularly.
git status
When you use git status, you will be able to check on
the state of your local repository. It will let you know 1) what items
have not been staged for a commit and 2) what items have been staged for
a commit. In other words, it lets you know the state of your current
work.
git log
As you have already seen, git log lets you know the
history of commits for your repository. When you use
git log, you can scroll with the spacebar or the up and
down arrows. You can exit by typing q.
git branch
You use git branch to see your branches. You have
already used git branch which lets you see the branches in
your local repository.
This command can also let you view branches in your remote repository:
git branch -r
Let's try it out. As you will remember, you've already created a new
branch for your repository on GitHub. You named it
branch2. Make sure you are in your local repository
folder and then type git branch -r. You will get the
following printout:
  origin/HEAD -> origin/main

  origin/branch2fr

  origin/main
Take a moment to understand what this means. The notation
origin is simply the default name of the GitHub location
and allows us to distnguish between your local and remote
repository.
HEAD is a variable that points to where you are on a
specific branch. While it may initially look like there are three
branches listed, the origin/HEAD -> origin/main simply
means that your HEAD references the main branch.
So, what you have are two branches: the main branch and
the second branch that you created: branch2.
Remote Tracking Branches
In the previous section, you saw that you can view remote branches
using git branch -r. If you want to edit a remote branch,
you will want to create a "tracking" copy of the branch.
To do this, you use the following command:
git checkout --track -b branch2 origin/branch2fr
You already know that git checkout -b creates a new
branch, which you are calling branch2.
Have a look what has happened by typing git branch in
the command line. Not only has a new branch been created, but you are
now working on branch2.
The –track command turns your local branch into a
remote-tracking branch. What this means is that Git 1)
will keep track of the updates between the local and remote branch and
2) will know what to sync with a get pull command.
You can see which of your local branches are remote tracking branches as well as which remote branches they are connected to with the command
git branch -vv
When working on a large project, you probably will only create remote tracking branches for the branches that you are developing.
If you create a new branch in your local repository, it won't necessarily become a tracking branch if you upload it to your remote repository. To see this, let's create a new local branch. First, you need to switch to your main branch:
git checkout main
Now, create a new branch based on your main branch:
git checkout -b branch3
This creates a new branch (branch3) off of your main branch. You can see that this branch is not connected to any remote repositories by typing
git branch -vv
If you want to upload this to your remote repository and have it tracked, you will use the following command:
git push --set-upstream-to origin branch3
If you type git branch -vv in the command line, you will
see that you are now tracking the remote repository
origin/branch3.
Fetching and Merging
git fetch
When you want to review changes to your remote repository before
adding them to your local machine, you use git fetch. This
command fetches the updates from the remote repository, but it does not
merge them with your local repository. This allows us to review the
changes before a merge.
Let's see how this works. Go to the GitHub repository in your browser. Navigate to branch3 and add a new file with the name file4.md. You can add any text you wish in the file.
Go to your command line and navigate to your repository. To fetch the update from the remote repository, you will type:
git fetch origin
You could also type
git fetch --all
Both commands fetch all of the updates from the remote repository for you to review.
Similarly, you can do a fetch for specific branches:
git fetch origin/branch3
git diff redux
You have already used the git diff command. As you will
remember, it allowed us to see the difference between the file you were
working on and the file that was staged before a commit. It does the
same thing for us in the contect of fetch.
You can utilize it in a number of ways. You can look at the differences between your local branch3 and your remote branch3 with the following command:
git diff branch3 origin/branch3
You will see not only file4.md but also the text of the file.
You can use git diff at any stage of your workflow. For
example, let's say that you are editing a document on your local main
branch. Every so often, you are using the git add command
to stage your files before a commit. If you want to
know all of the staged changes you have made, you type:
git diff --cached
You will be able to double-check all of the changes you made before
you run git commit.
git merge
When and if you are happy with remote changes, you can
merge them into your local repository. To do this, you
would use the following command parameters:
git merge REMOTE-BRANCH-NAME LOCAL-BRANCH-NAME
Try merging the remote branch3 with your local branch3:
git merge origin/branch3 branch3
The output will state that there was "1 insertion." If you use the
ls command, you will see that file4.md has
been added to branch3 in your local repository.
git pull
Instead of fetch and merge, some people use
the git pull command, which combines fetch and
merge into one step. While you might want to use
git pull if you are connecting your local repository to a
GitHub repository for the first time (as you did earlier in this
tutorial), you should be a bit more cautious with this command when you
are collaborating with other people.
Using git pull skips the review step, which means that
you won't be able to comapre and contrast differences in your
repository. Only use git pull if you are absolutely
positive that there are no merging conflicts.
Pushing Files to a Remote Repository
As with git pull, there is a git push
command, which sends local updates to your remote repository.
It's important to keep in mind that Git will not allow you to overwrite a branch in a remote repository if there are unsynced updates. This is another reason to keep your local repository synced with your remote repository.
git push
Conflicts
At some point in your work, you will run into conflicts between branches or between your local repository and your remote repository. While you will want to avoid conflicts as much as possible by using good communication and establishing a workflow process with your collaborators, conflicts are generally not big problems--assuming, of course, that you are making discrete commits and and syncing regularly.
If you do run into a conflict, Git allows you to compare versions, choose the version you would like to keep, and ignore the changes you don't want to make. To see how conflicts work, let's force a couple of conflicts to see how to resolve them.
In your local repository, make sure that you are in the main branch:
git branch #this will tell us what branch you are on

git checkout main #this will switch us to the main branch
Create a new file on your main branch titled
file5.md, and let's add text to the file: "This is
file5, and I think the text might conflict with my remote repository."
To do this, you use the touch command again:
touch file5.md
You can edit this note to edit it by using the open
command:
open file5.md
Don't forget to commit the file to your local repository:
git add .

git commit -m "created file5.md"
Now, create a file in your GitHub repository with the same filename, but let's give it different text. To do this, open the GitHub repository in your browser, make sure you are in the main branch, and create a file named file5.md. Include the following text: "This text in my remote repository is definitely different from the my local repository."
See what happens when you attempt to fetch this
file:
git diff main origin/main
You will get a report similar to this:
diff --git a/file5.md b/file5.md

index 272b8fc..045768b 100644

--- a/file5.md

+++ b/file5.md

@@ -1 +1 @@

-This text in my remote repository is definitely different from the my local repository.

+This is file5, and I think the text might conflict with my remote repository.
Without going through every line, here is what you are seeing:
The
diffcommand has indicated that a/ is the remote version of file5.md. The b/ file is your local version of file5.md.The remote file is indicated with a minus sign, while the local is indicated by a plus sign.
The report indicates where the text conflicts by reprinting the remote text next to the minus sign and the local text next to the plus sign.
Now that you have recognized the discrepancy between the two files, you can fix them before you merge them.
Let's say, however, that you forget to run the diff
command and just attempt to merge the files:
git merge origin/main main
The result is that you get an error message:
Auto-merging file5.md

CONFLICT (add/add): Merge conflict in file5.md

Automatic merge failed; fix conflicts and then commit the result.
Fortunately, Git has built in tools to resolve this conflict. To understand what is happening, let's look at a visualization.
    gitGraph

       commit id: "commit 1"

       branch "origin/main"

       commit id: "origin/commit 2"

       checkout main

       commit id: "commit 2"
Effectively, what you have done is create a local and a remote branch with the same name. When you added text to them, you sent them down different development paths so that commit 2 on your local branch looks different than commit 2 on your remote (origin/main) branch.
You want to merge commit 2 and origin/commit 2, but they have different text on the same lines. Git can't merge them, because it doesn't know which version you prefer. You will have to tell it.
You already know that you have issues with file5.md. You can use
git status to get more information. If you enter
git status in the command line, you will get a report that
looks something like this:
On branch main

Your branch and 'origin/main' have diverged,

and have 1 and 1 different commits each, respectively.

  (use "git pull" to merge the remote branch into yours)

You have unmerged paths.

  (fix conflicts and run "git commit")

  (use "git merge --abort" to abort the merge)

Unmerged paths:

  (use "git add <file>..." to mark resolution)

        both modified:   file5.md
You have a few options at this point. As the report states, you can abort the merge and come back to the issue later by typing
git merge --abort
While it is not recommended, you could also do a
git push or git pull and then deal with the
conflict in your local or remote editor.
The preferred response is to address the problem using the following procedure. Because you have attempted a merge (and Git has recognized a conflict) it has updated your file with the conflict information. To see the conflict, just open the file:
open file5.md
You will see that the file has been changed and that the text looks like this:
<<<<<<< HEAD

This is file5, and I think the text might conflict with my remote repository.

=======

This text in my remote repository is definitely different from the my local repository.

>>>>>>> origin/main
While at first this may look confusing, it's relatively easy to interpret. The top section, labelled HEAD indicates your local file and the beginning of the text conflict. Underneath the ====== is the text from your remote file on the origin/main branch.
Since you are already in a text editor, all you need to do is edit the text. Delete the additions added by Git (e.g. <<<<<< HEAD) and change the text to "I have synced my local and remote repository text" and click save.
You have effectively resolved the conflicts by telling Git what you
want the final text to look like. Now, all you need to do is make an
add, commit, and push:
git add file5.md

git commit -m "merged my local and remote file"

git push
If you go to your remote file in GitHub, you will see that the file text has been updated.
As you can see, Git prevents us from accidentally overwriting text, and it gives us a relatively easy method for resolving conflicts. You can use the same process that you used for remote merges on your local repositories.
If you want to compare local branches before a merge, you would follow the same process as above:
git diff main branch2
Forking in GitHub
Assuming that a repository is set to public, users who do not have write privileges to a repository can still copy your repository to their own GitHub repository. This process is known as a fork. It allows you to clone somebody else's repository and develop it in a new direction.
Forking is useful because you can allow other people to experiment with your repository without giving them user access to your project. Their repository is a fork of your repository, and they can transform or update their copy as they wish. If they develop an improved version of the repository, they may open a Pull Request from their fork. If you decide that you would like to merge their changes to your repository, you can pull their files into your repository.
Forking in GitHub allows multiple users to work on developing the same project even if only one of them manages the primary account. Additionally, this feature allows users to create new versions of a project that can evolve in a different direction from the original.
If you would like to fork another person's repository, you simply navigate to their GitHub page and click the fork button. You will add it to your account and then you can edit it in GitHub or create a local repository following the directions outlined above.
Pull Requests
Pull requests are different from the pull command. Pull
requests are unique to the GitHub interface, while pull is
a command for Git. There are commonalities, but whereas you don't need
to use the pull command in Git (remember, pull
collapses the fetch and merge commands), you
will need to work with Pull Requests in GitHub.
As you are working with GitHub, you are going to have a local
repository on your machine and a remote repository on the GitHub server.
Other users may be developing a branch, and still others
may have a forked version of a repository in their own GitHub
repositories as well as a cloned copy on their local machines. Keeping
track of everything can get a bit complicated, so it is essential that
you follow best practices by 1) maintaining a workflow that supports
collaboration, 2) using branches to develop your work, and 3) keeping
each commit limited to a single feature, making them
regularly, and providing good descriptions.
Making a Pull Request
As you can imagine, multiple people working on different branches and forks means that you will eventually want to merge their updates into your main work.
Below, you can see what appears after there has been activity on a branch. In this case, we used GitHub to write this tutorial, and one of the co-authors was potenitally ready for a pull request.
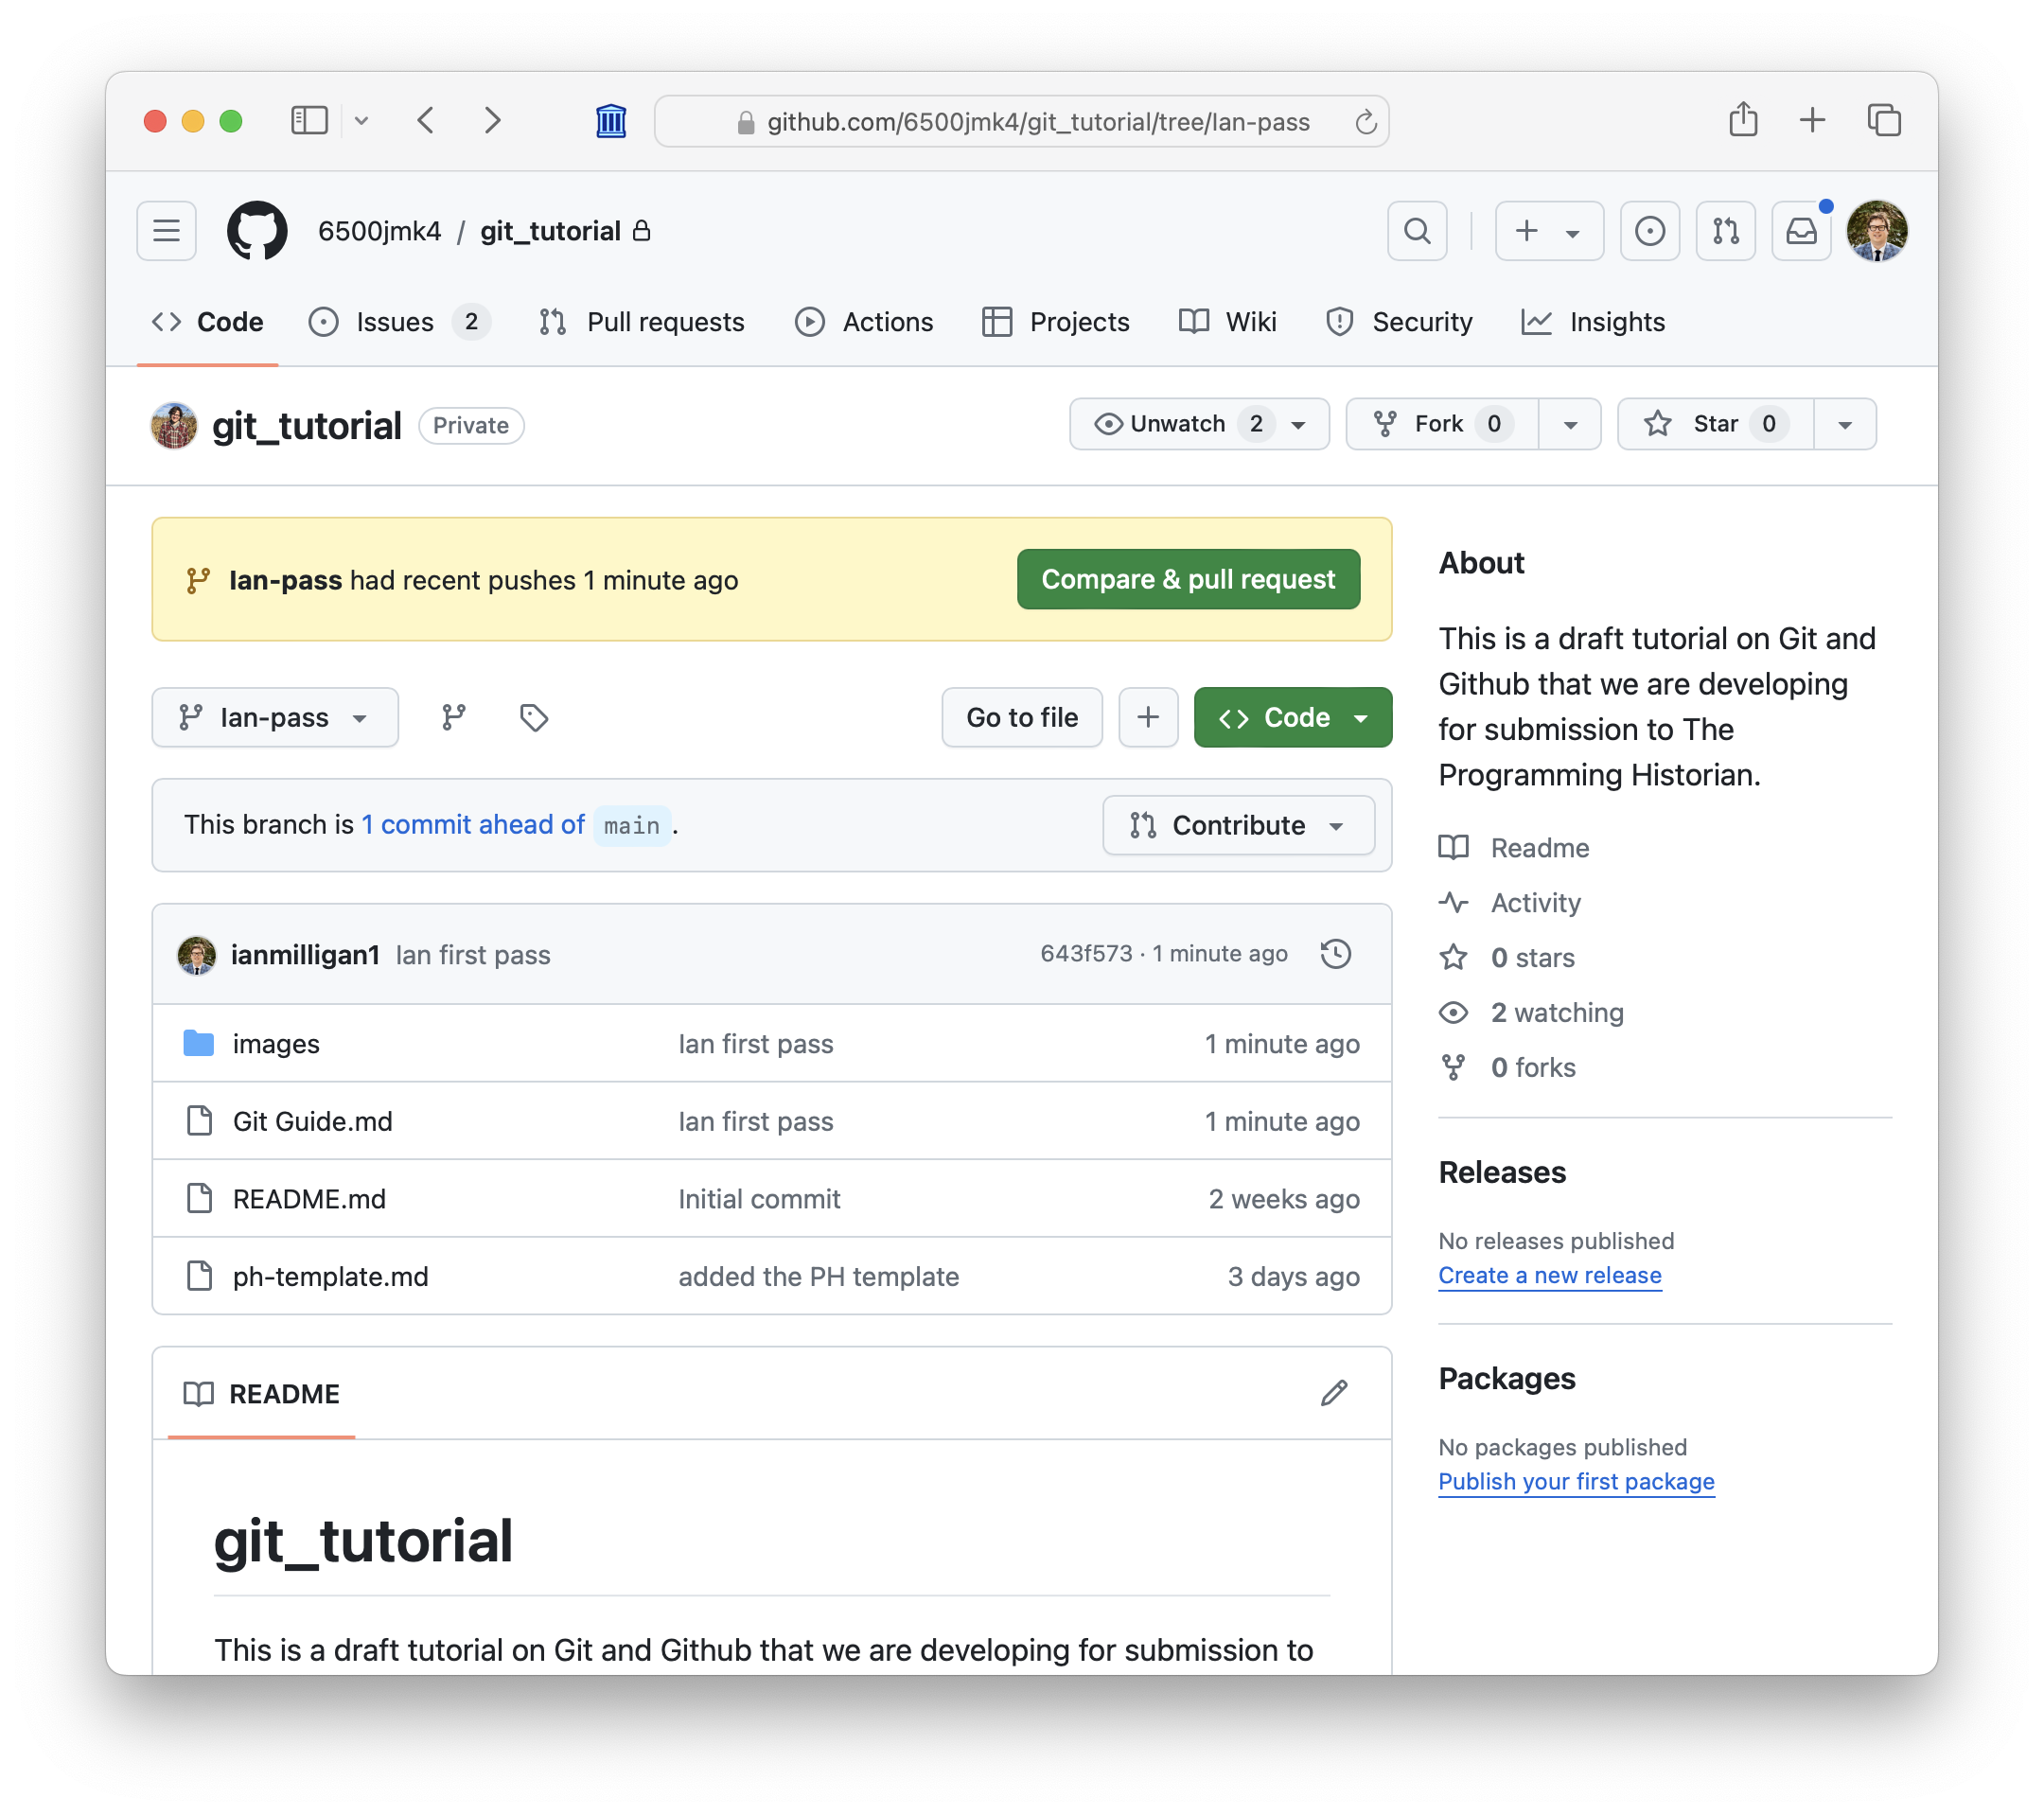
To open a pull request, you can either click on the Compare & Pull Request button or you can click on the "Pull Requests" tab and select New Pull Request. Doing so opens up a window like the following:
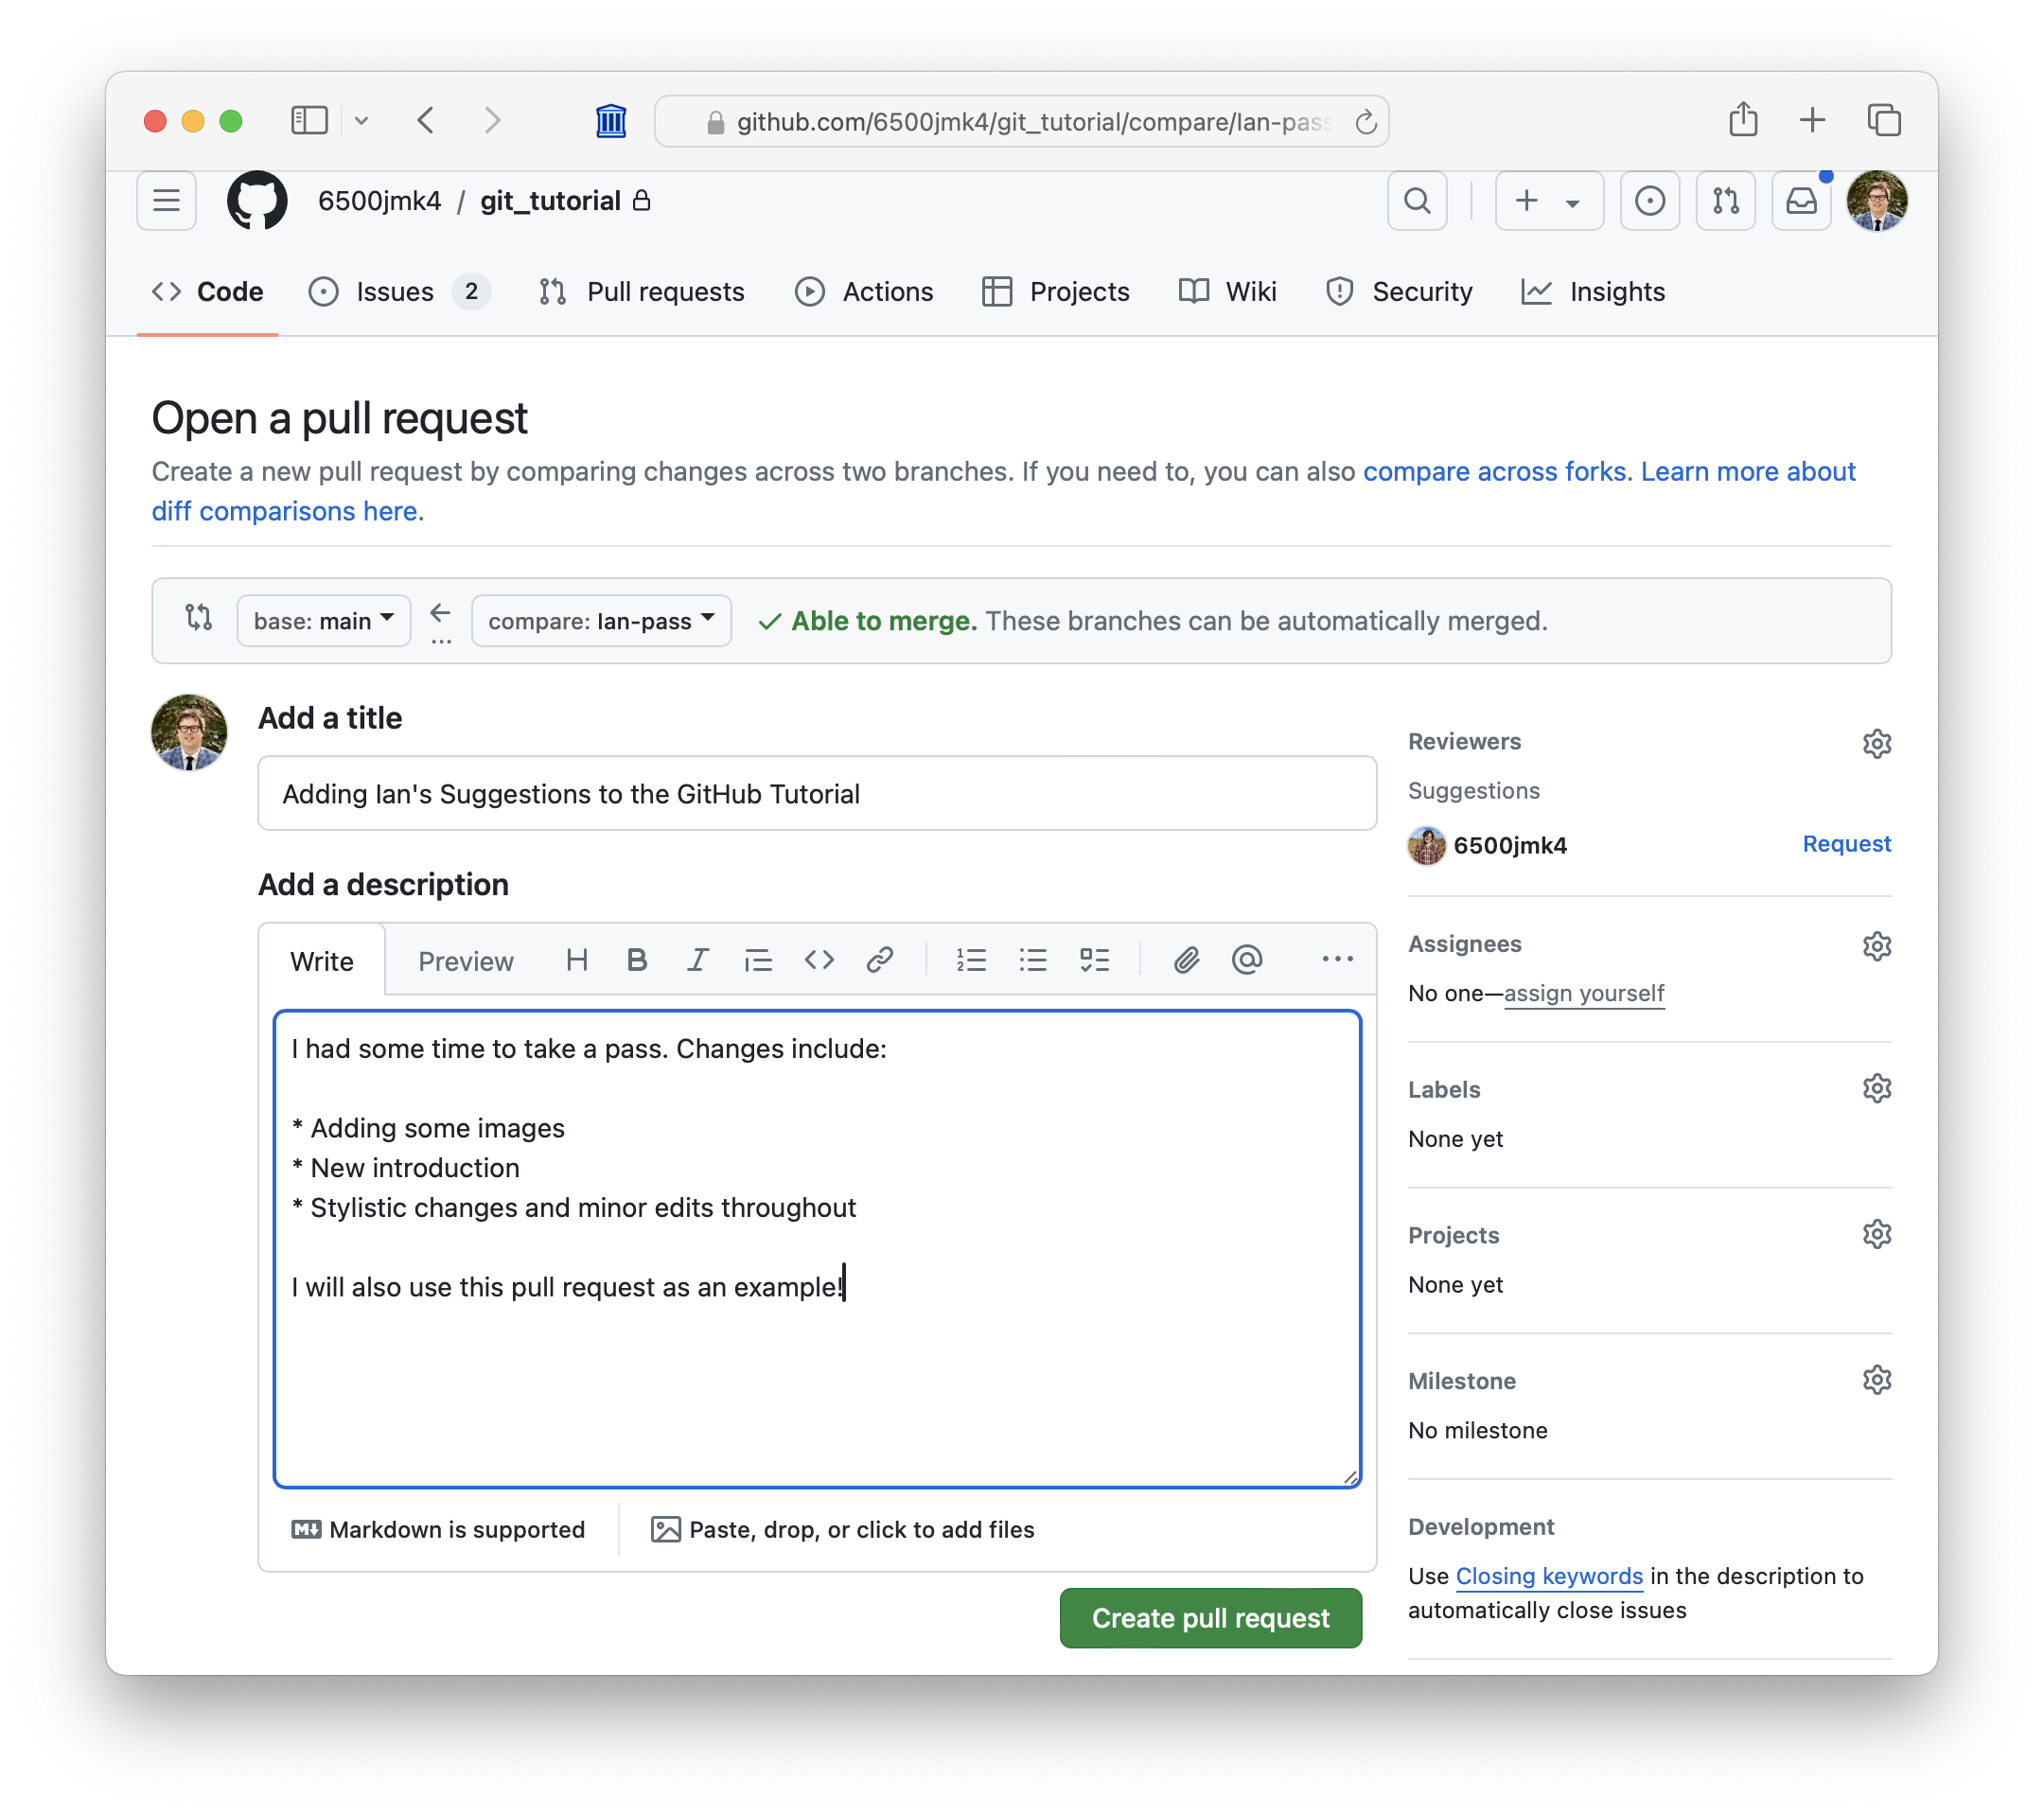
A good pull request explains what is happening: a list of major changes, for example, to assist in reviewing. If there are no conflicts, the pull request can be merged automatically. However, if merging the pull request would lead to conflicts, these will have to be resolved (see below).
Reviewing Pull Request
Once a pull request has been opened, it is ready to be reviewed.
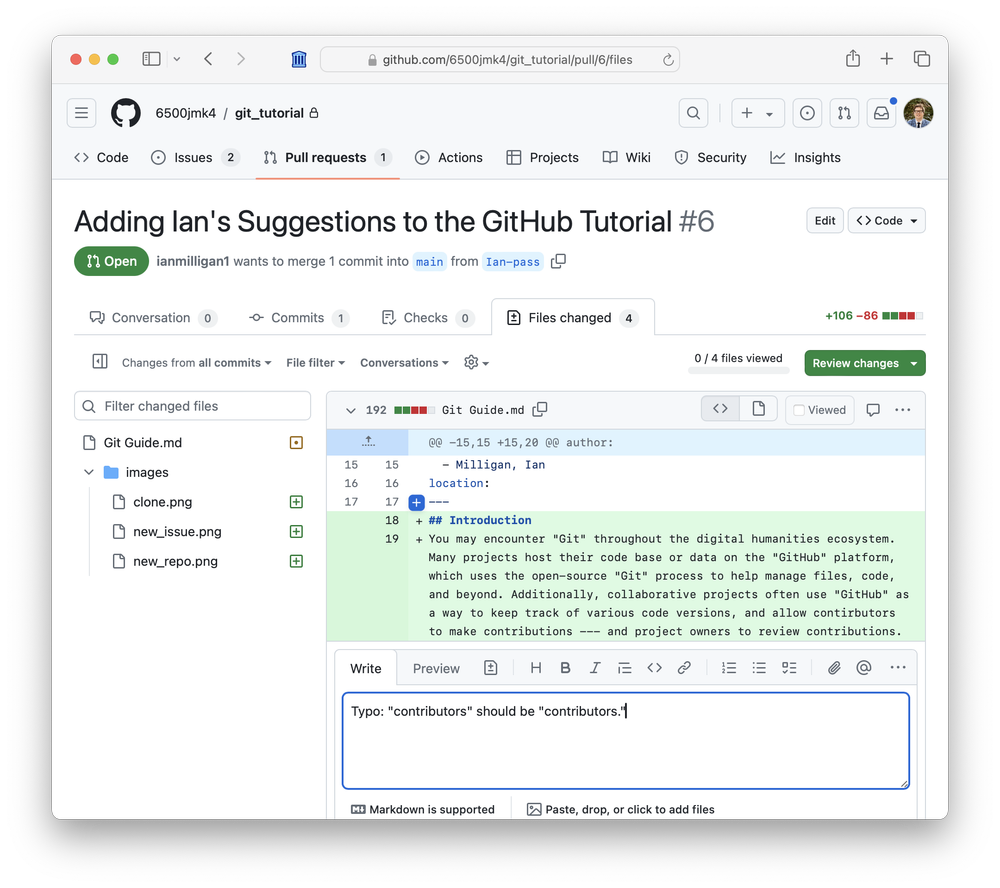
Pull Request Conflicts
As you have seen earlier in this tutorial, it is inevitable that conflicts will emerge when merging repositories.
As you saw with Git, the program will let you know when there is a merge conflict, and it will identify where the conflict is in your files. GitHub provides a similar experience that you may enjoy using.
You will know that there is a conflict, when you go to open up a pull request and you see a red X with the warning that you "Can't automatically merge."
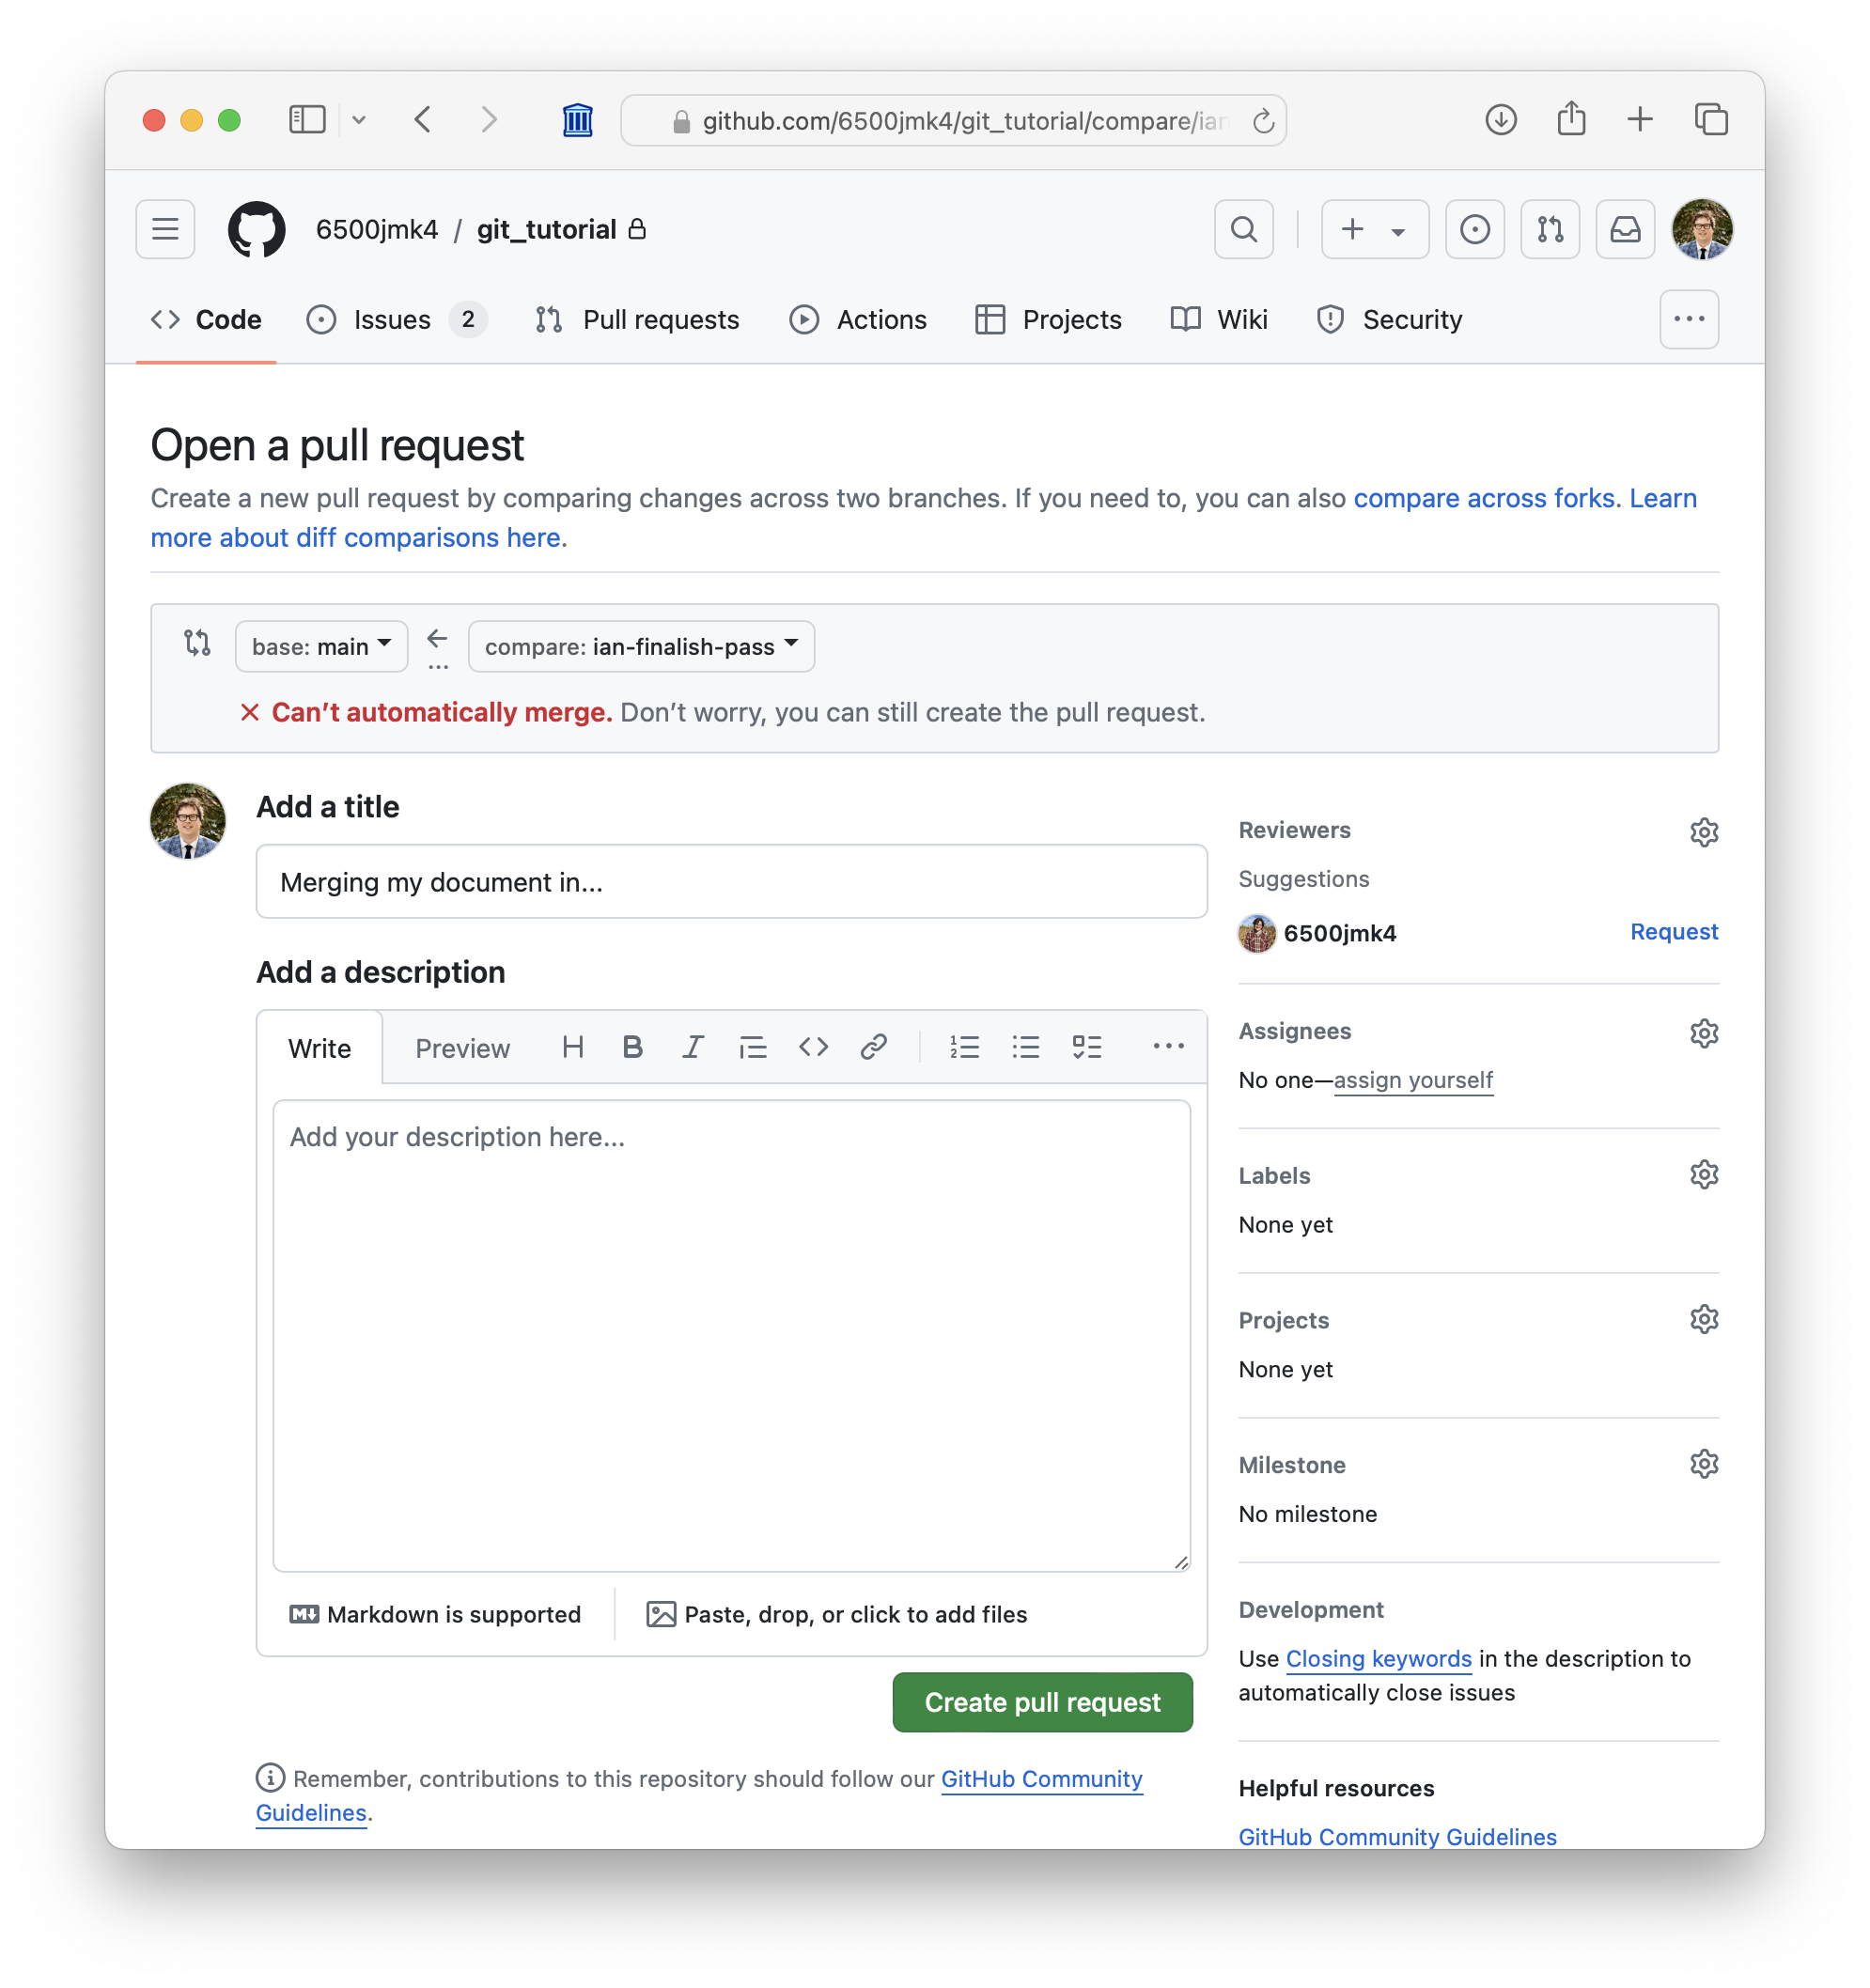
Don't worry!
Create the pull request as you would normally. But, where you would normally see the "merge" button, you will now see that you will need to resolve the conflicts.
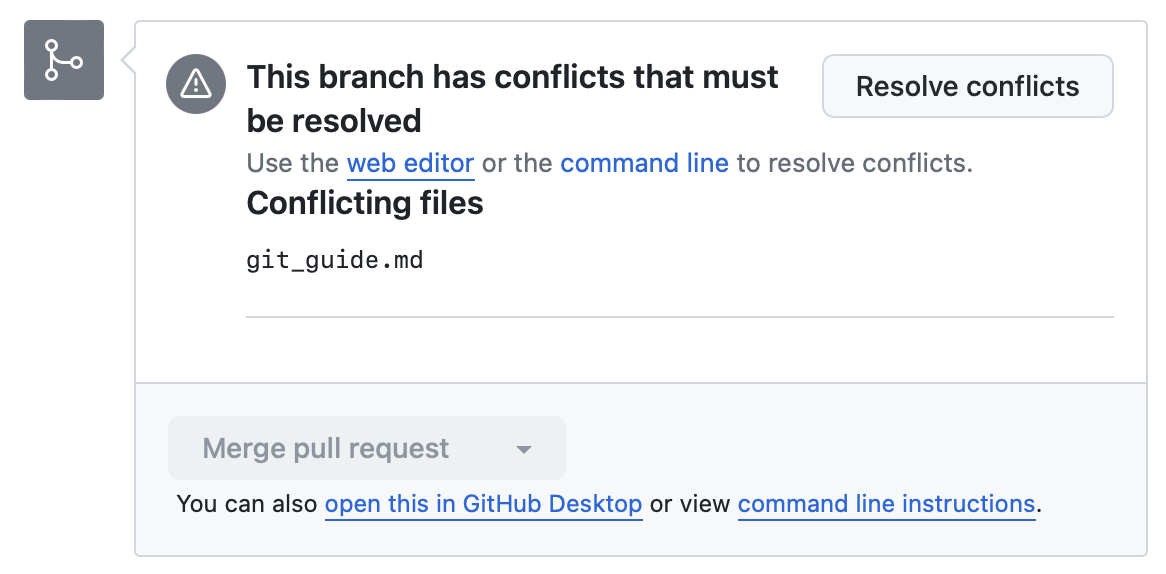
When you select this button, you will see a familar text editor that
provides identical functionality to the merge resolution issues that you
handled using git. Remember that the top section, labelled
HEAD indicates the local file and the bottom part,
underneath ======, refers to the remote file. The image below shows what
the affected area looks like in the repository:
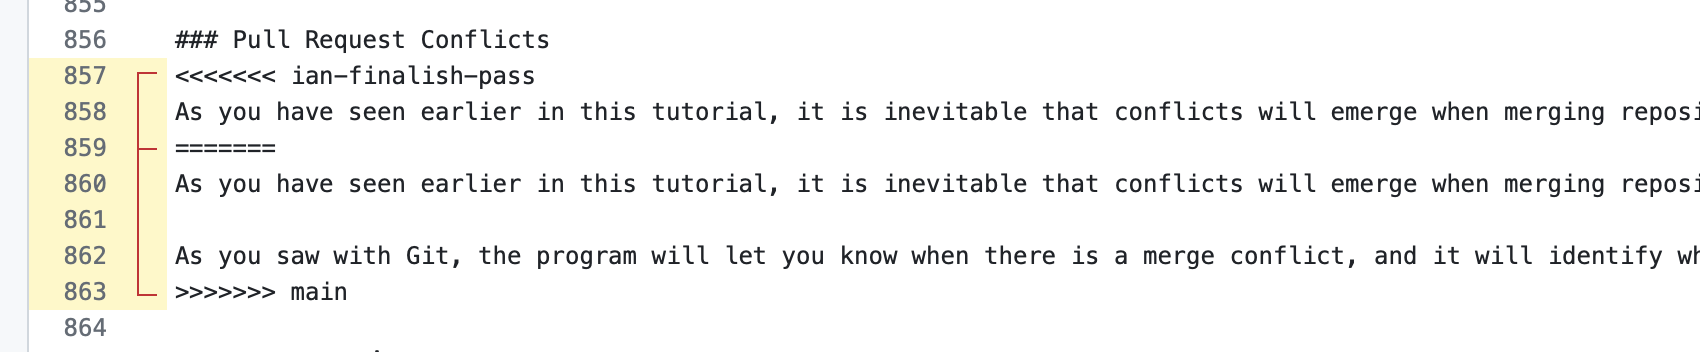
You just need to edit the text to what you want the final text to be.
Conclusions
As you have seen throughout this lesson, Git and GitHub offer considerable advantages for any digital humanist who is undertaking a complicated, collaborative project.
This tutorial, as comprehensive as it is, has only provided a relatively basic introduction to Git. There are many more commands, as well as functionalities within GitHub, to explore. More information can be found in the Git and GitHub documentation pages. With the basic foundation in this lesson, however, we believe that you will be well equipped to undertaking more advanced projects.
We hope that you enjoy your time with Git!